Getting started
Welcome to the very first Uniform tutorial! This tutorial will guide you through the process of building a web application that uses a full set of Uniform's capabilities:
- Build a web application using your preferred front-end framework.
- Enable personalization to be controlled by non-developers, such as marketers and merchandisers.
- Enable layout to be controlled by non-developers.
tip
This is a very basic web app by design. This will allow you to focus on the Uniform bits instead of getting caught up with styles, design or complicated application functionality.
The tutorial supports the following front-end frameworks. If you use one that is not listed, let us know so we know people are interested in more examples:
Before you start
You must have the following available in order to complete this tutorial:
- Node.js v14+ installed locally.
- Uniform account with administrator access. If you do not already have one, you can sign up for a free account at https://uniform.app.
- Uniform extension for Google Chrome. This is optional, but this tutorial uses it to help explain how Uniform classification and personalization work.
Finished code
In case you prefer to learn by looking at a finished solution, we provide a finished version of the Getting Started Tutorial application that you can get running in your preferred environment.
Before you start
You must setup a Uniform project before you can load the finished code.
- StackBlitz
- Local machine
Add the following permissions to your Uniform API key:
Uniform Canvas > Component Library > Manage
Uniform Canvas > Compositions > Create
Uniform Canvas > Compositions > Publish
Uniform Canvas > Compositions > Update
Uniform Context > Signals > Create
Uniform Context > Signals > Update
caution
You should always assign the minimal permissions required to meet your requirements. Since this you are going to load configuration from a code repository into Uniform, you need permissions to write to Uniform.
For more details on permissions, see the administrator guide.
Start a development environment:
- Next.js
- Nuxt 3
After you open StackBlitz you will see an error that the "API key was not valid". You must set the variables in
.envas described in the steps.Changing the
.envfile should cause the container to restart. If it doesn't, reload your browser window. You will see an error that the "Slug not found". This is because the composition with the specified slug hasn't been created in your Uniform project.In StackBlitz, open a new terminal.
Enter the following command:
npm run uniform:pushEnter the following command:
npm run uniform:publishAbout this step
This script is run separate from
uniform:pushdue to timing. It is possible the command to publish the compositions will be triggered before Uniform has fully processed the imported compositions, which results in an error. Adding in the delay required to enter theuniform:publishcommand manually is sufficient to ensure the compositions have been processed.If you get a permissions error, try running the command again.
Close the terminal.
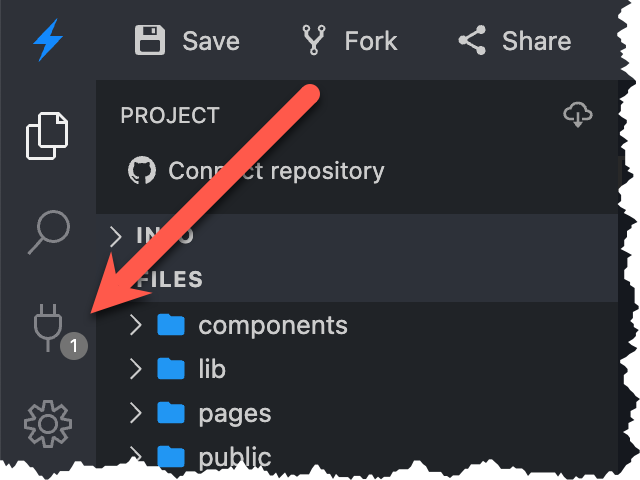
In the activity bar the plug icon indicates that 1 port is in use. Click this icon.
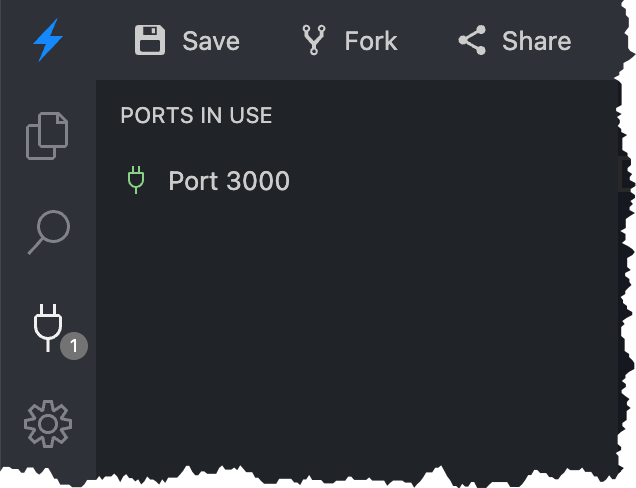
You will see links to the web app running on the 1 port. Click the link for Port 3000.
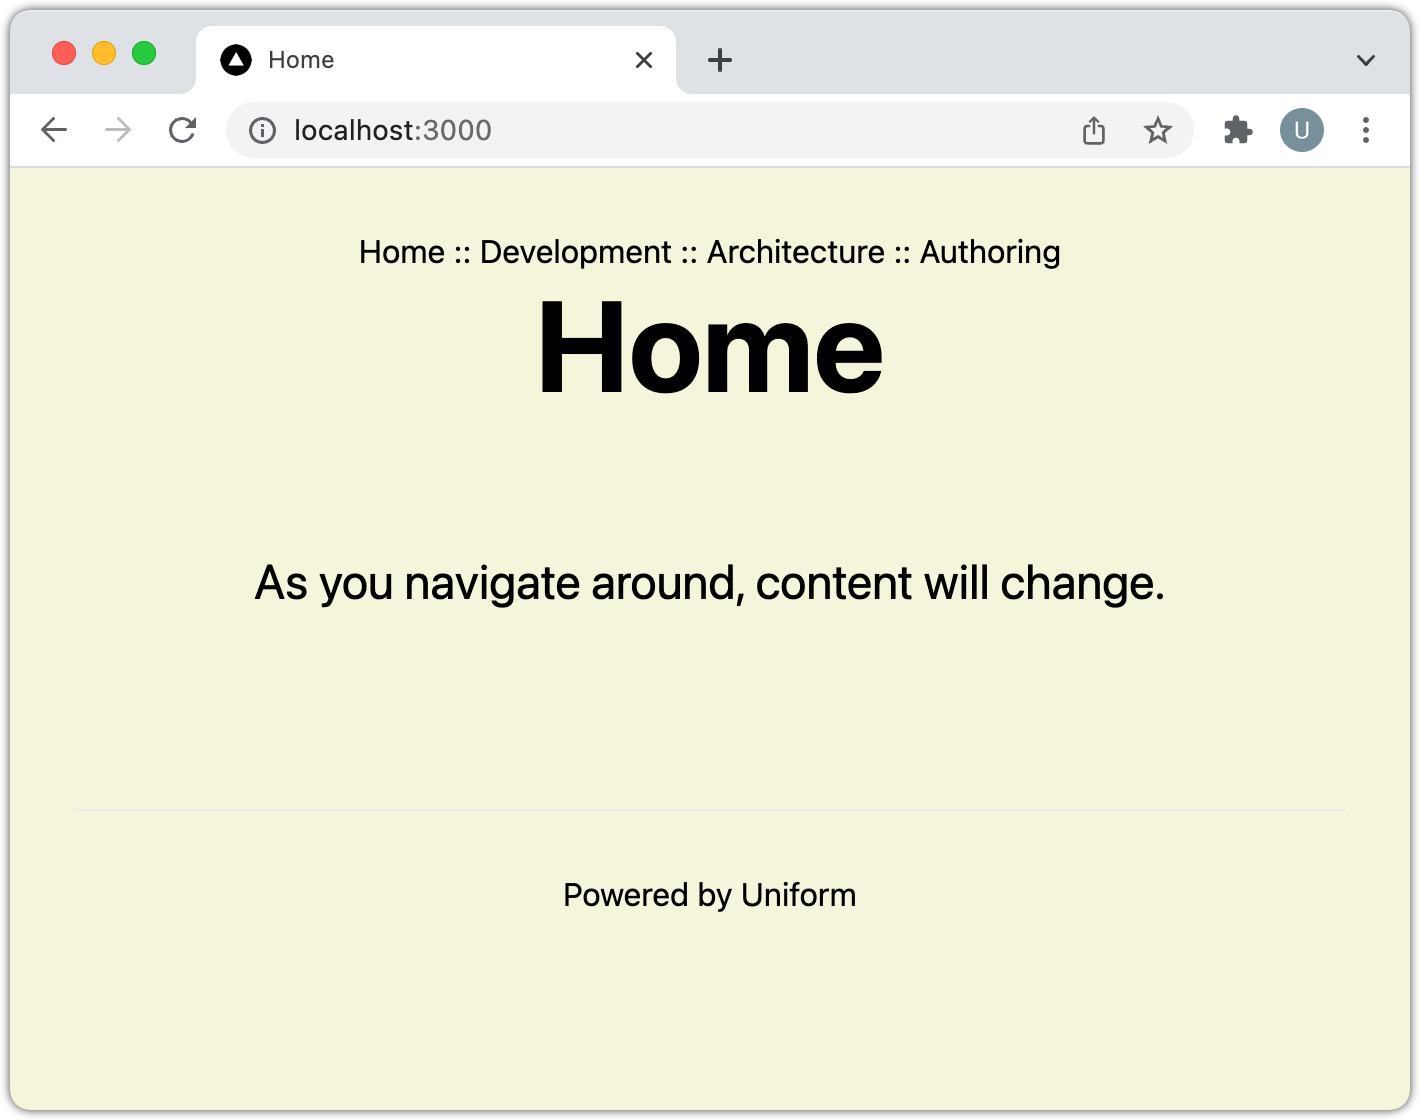
A new browser tab opens. This is your Next.js application running in develop mode.
https://uniformdev-uniform-docs-examples-######--3000.local.webcontainer.io/
Add the following permissions to your Uniform API key:
Uniform Canvas > Component Library > Manage
Uniform Canvas > Compositions > Create
Uniform Canvas > Compositions > Publish
Uniform Canvas > Compositions > Update
Uniform Context > Signals > Create
Uniform Context > Signals > Update
caution
You should always assign the minimal permissions required to meet your requirements. Since this you are going to load configuration from a code repository into Uniform, you need permissions to write to Uniform.
For more details on permissions, see the administrator guide.
Enter the following commands:
- Next.js
- Nuxt 3
git clone https://github.com/uniformdev/examples
cd examples
cd examples/docs/getting-started/nextjs/finished
git clone https://github.com/uniformdev/examples
cd examples
cd examples/docs/getting-started/nuxtjs/finishedSet variables in
.envas described in the steps.Open a command-line interface (CLI) in the root folder for the repository.
Enter the following command:
npm installEnter the following command:
npm run uniform:pushEnter the following command:
npm run uniform:publishAbout this step
This script is run separate from
uniform:pushdue to timing. It is possible the command to publish the compositions will be triggered before Uniform has fully processed the imported compositions, which results in an error. Adding in the delay required to enter theuniform:publishcommand manually is sufficient to ensure the compositions have been processed.If you get a permissions error, try running the command again.
Enter the following command:
npm run devAbout this step
This will start the Next.js app in develop mode on port 3000.